Recategorize Transactions
This window lets you move a selected set of transactions from one category and keyword to a different category and keyword. Use it when a single broad keyword has matched many different kinds of purchases and you want to split them into more specific categories.
Broad vs. specific keywords
A broad keyword is a short phrase that matches a large, mixed set of transactions. In the example above, from Joe's sample budget, Armazones Online is a broad keyword under Extra Expenses > Shopping > Online Shopping. It catches books, groceries, and general shopping purchases all at once, because the merchant description contains that phrase for everything you buy from them.
A specific keyword is a longer phrase that targets just one kind of purchase. For instance, Armazones Online Grocery only matches grocery purchases, while Armazones Online Books only matches book purchases. Because a keyword matches any transaction whose description contains it, a longer phrase is naturally more selective.
The typical workflow with this window is:
- Identify that a broad keyword is catching transactions that really belong in different categories.
- Create (or pick) a more specific target category and add a more specific keyword to it.
- Click the Recategorize button to move the matching transactions over.
- Once all transactions have been split out, delete the original broad keyword so it no longer catches new imports incorrectly.
Important: The original broad keyword is not removed automatically. After recategorizing all transactions, click Close and you'll be asked whether to delete the original broad keyword. If you decline, you can still delete it later by opening Edit Category on the source category—otherwise it will keep matching future imported transactions back to the original, less accurate category.
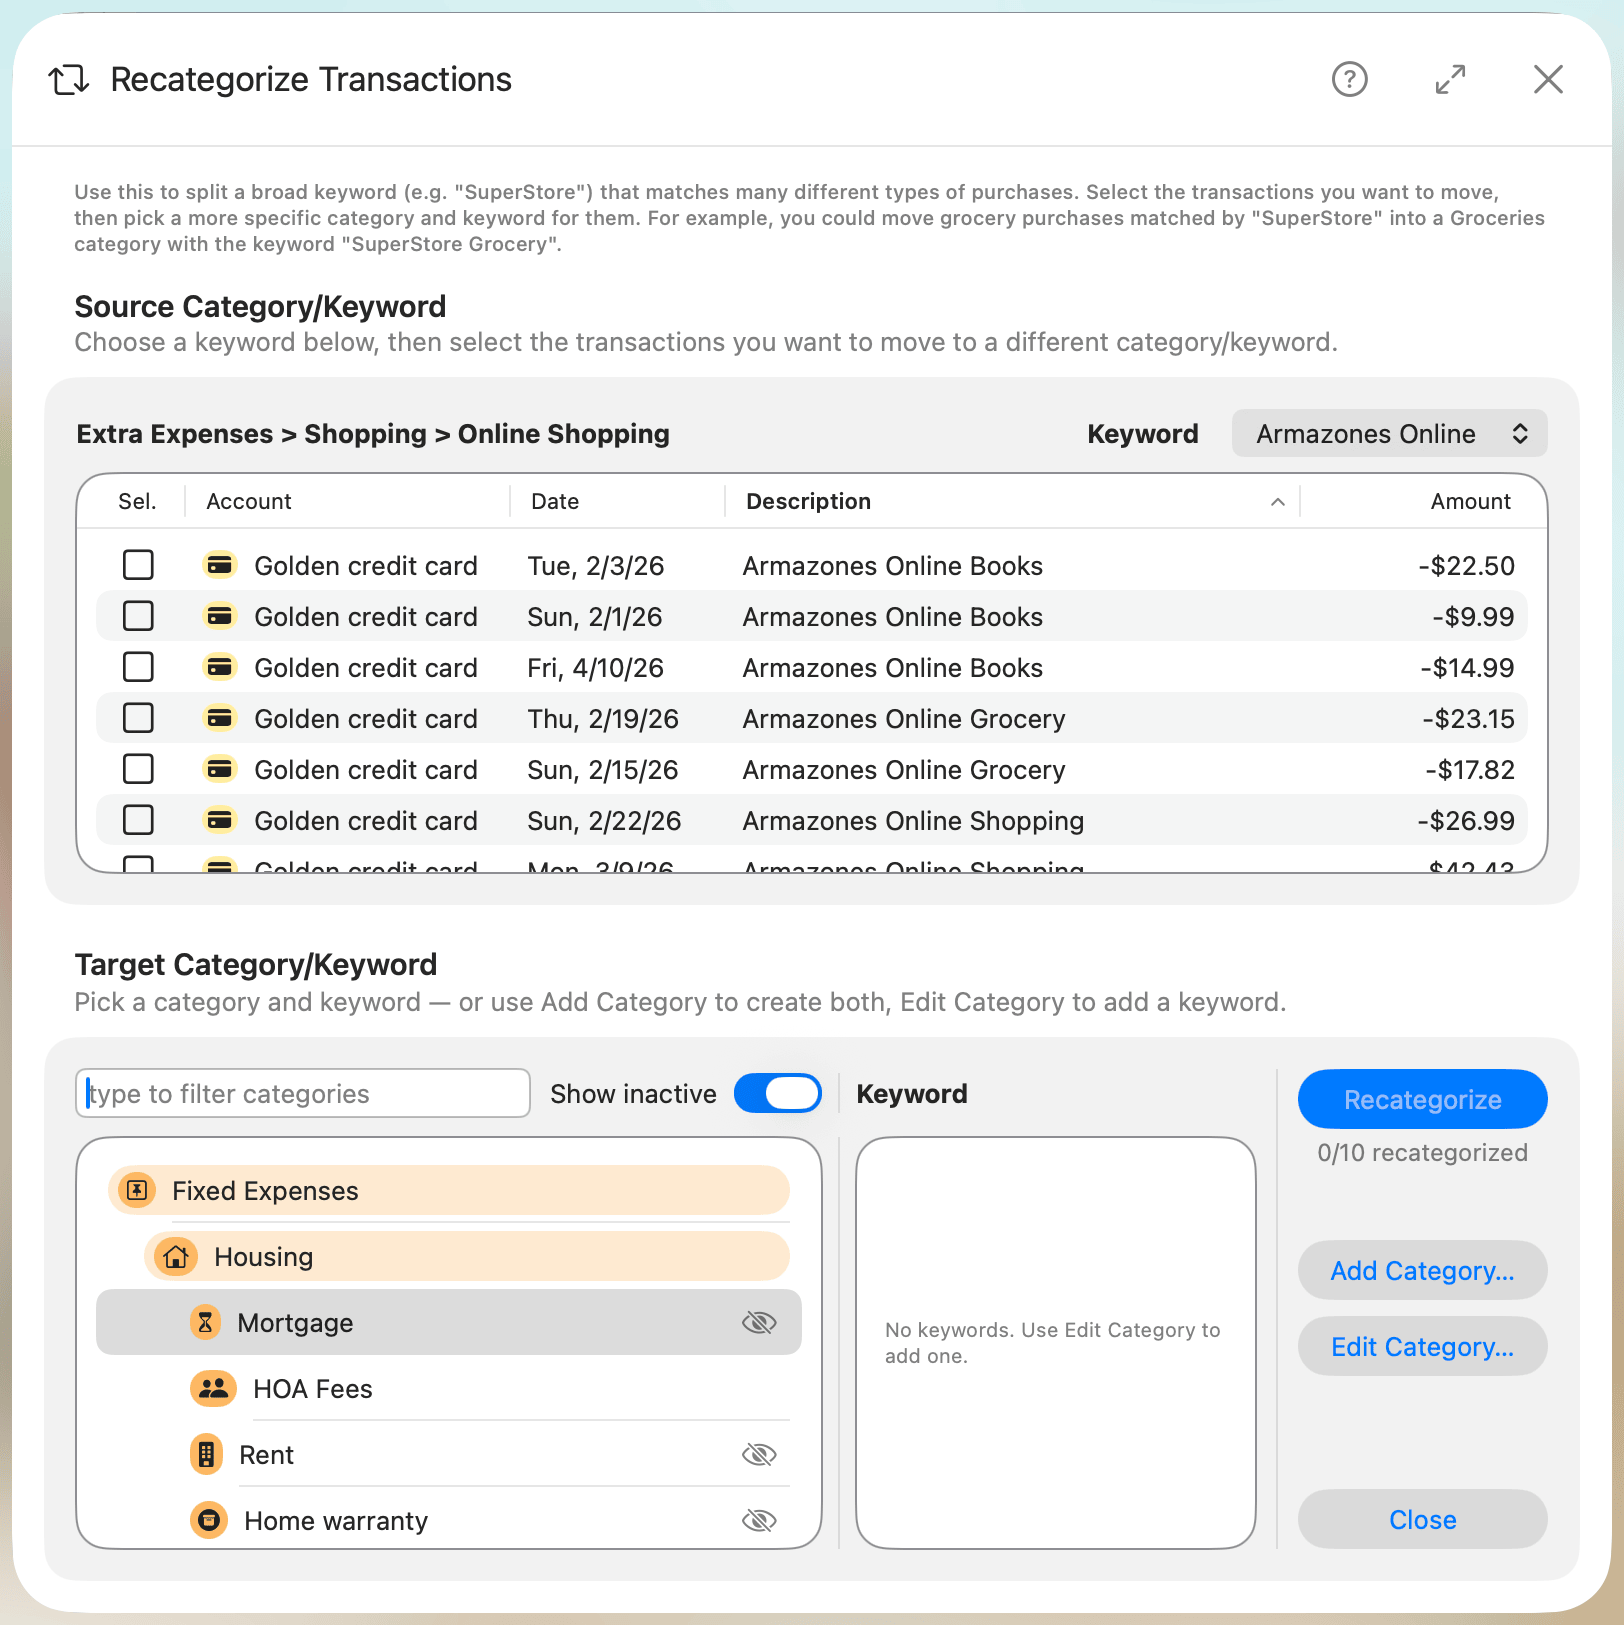
Source Category & Keyword
The top half of the window shows the source category—the category you opened the window from—and lets you choose which keyword's transactions you want to recategorize. In the example, the source is Extra Expenses > Shopping > Online Shopping and the selected keyword is Armazones Online.
- Category: Displays the full path of the source category. This value is fixed for the current session.
- Keyword: Pick the keyword whose transactions you want to split out. The transactions table below refreshes to show only the imported transactions matched by the selected keyword.
Transactions
Select one or more transactions from the list to recategorize. Only imported transactions matching the selected keyword are shown—manual transactions and transactions matched by other keywords are not eligible and won't appear here.
Each row displays the account, date, description, and amount so you can confirm you're selecting the right transactions. In the example, the list contains rows like "Armazones Online Books", "Armazones Online Grocery", and "Armazones Online Shopping"—three different kinds of purchases that currently all land in the same generic Online Shopping bucket.
Click any column header in the transactions list to sort by that column; click again to reverse the order. The sort order isn't saved between launches — the table always opens with its default sort.
When you select a transaction, Budgix automatically selects every other transaction in the list that shares the same description. This saves you from ticking each one individually when a recurring merchant description produces many rows—just pick one "Armazones Online Grocery" transaction and all of them get selected at once.
Target Category & Keyword
The bottom half of the window is where you choose the destination for the selected transactions.
Category
Use the search field at the top to filter the category list, or browse the hierarchy directly. Only subcategories (categories without children) can be chosen as the target, and the source category itself is excluded from the list. The Show inactive toggle lets you include inactive categories in the list if you need to pick one.
If the category you need doesn't exist yet, you can create it on the fly without leaving this window—see Add Category. For the grocery example, you would pick (or create) an Online Groceries category.
Keyword
Once a target category is selected, its keywords appear in the list to its right. Pick the keyword you want the transactions to be matched against going forward. Continuing the example, you would select a specific keyword like Armazones Online Grocery on the Online Groceries category.
If the target category doesn't have a suitable keyword yet, use Edit Category to add one without closing this window.
Important: Both a target category and a target keyword must be selected before the Recategorize button becomes active.
Actions
Recategorize
Click Recategorize to move the selected transactions to the target category and keyword. A counter below the button shows progress in the format "recategorized / original" (for example, 0/10 recategorized) so you can track how many of the originally matching transactions have been moved during this session.
After the action completes, the moved transactions disappear from the source list. You can continue recategorizing the remaining transactions into other categories, pick a different source keyword, or close the window when you're done.
Add Category…
Opens the Add Category window so you can create a new target category without leaving the recategorize flow. The new category will appear in the target list once created, and its parent is inherited from the currently selected target category when applicable.
Edit Category…
Opens the Edit Category window for the currently selected target category. Use this to add the more specific keyword (e.g. Armazones Online Grocery).
Close
Closes the window. If you still have transactions selected that haven't been recategorized, Budgix will ask you to confirm before discarding the selection. If you've already recategorized all transactions, Budgix will ask whether you want to delete the original broad keyword. If you don't delete it, future imports will keep matching it instead of the new, more specific keywords.