New Budget Assistant
The New Budget Assistant guides you through creating a complete budget setup in just a few minutes. This step-by-step wizard helps you create your profile, configure your budget, set up categories, add accounts, and import transactions all in one streamlined process.
Getting Started
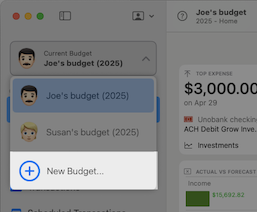
To launch the New Budget Assistant, click the New Budget... button from the budget picker dropdown in the main window.
Welcome Screen
The welcome screen explains what the assistant will help you accomplish:
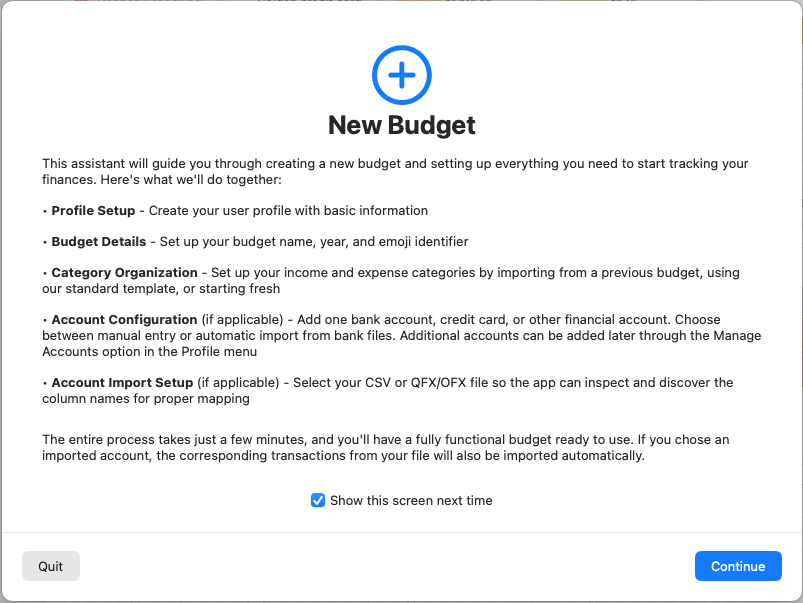
- Profile Setup - Create your user profile with basic information
- Budget Details - Set up your budget name, year, and emoji identifier
- Category Organization - Set up income and expense categories
- Account Configuration - Add your first financial account
- Account Import Setup - Configure transaction file importing (if applicable)
Show this screen next time - Uncheck this option to skip the welcome screen in future sessions and go directly to the first setup step.
Step 1: Create New Profile
This step appears only if you haven't created a user profile yet. If you already have a profile, the assistant skips directly to budget creation.
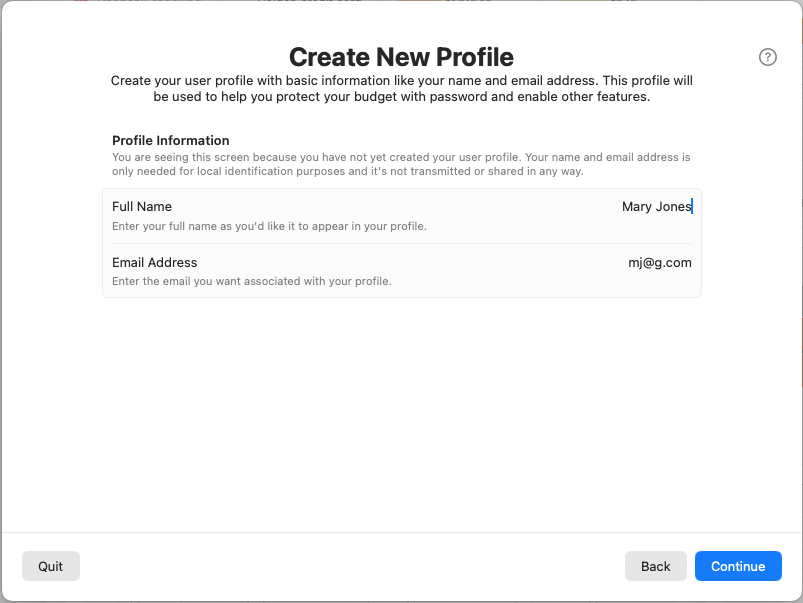
Profile Information
Full Name
Enter your full name as you'd like it to appear in your profile. This information stays on your local computer and is never transmitted or shared.
Email Address
Enter the email address you want associated with your profile. This is used for local identification purposes only and is not transmitted or shared in any way.
Your profile information helps protect your budget with password features and enables other advanced functionality within the app.
Step 2: Budget Details
Set up the basic information for your new budget.
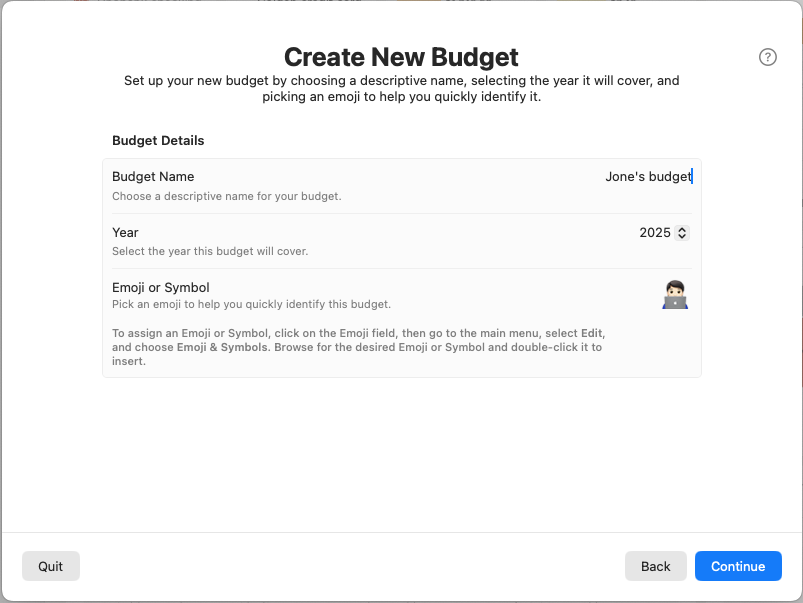
Budget Information
Budget Name
Choose a descriptive name for your budget. Good examples include "Family Budget," "Personal Finances," or "Household Budget."
Year
Select the year this budget will cover. This defaults to the current year but can be changed to create budgets for future or past years.
Emoji or Symbol
Pick an emoji to help you quickly identify this budget in lists and menus. Click on the emoji field to open the system emoji picker.
To assign an emoji:
- Click on the emoji field
- Go to Edit > Emoji & Symbols in the main menu
- Browse for your desired emoji
- Double-click to insert it
Step 3: Budget Goals and Categories
Choose how to organize your income and expense categories.
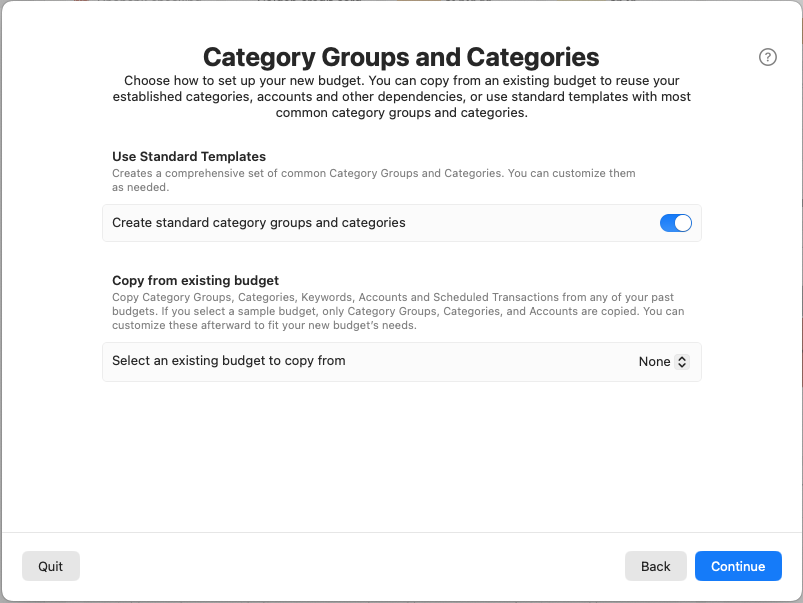
Setup Options
Create standard Budget Goals and categories - Enable this toggle to create a comprehensive set of common Budget Goals and categories that work for most households. You can customize these later as needed.
Copy from existing budget
If you have previous budgets, you can copy their complete structure, including:
- Budget Goals
- Categories
- Keywords for automatic transaction categorization
- Accounts
- Scheduled Transactions
Select an existing budget to copy from - Choose which budget to copy from the dropdown menu. Sample budgets will only copy budget goals, categories and accounts.
Advanced Options (when copying from existing budget)
Remove unused keywords - Automatically removes keyword associations that are no longer needed after copying.
Deactivate empty categories - Automatically deactivates categories that have no keywords and no transactions, helping keep your category list clean.
Step 4: Create New Account
Add your first financial account to the budget.
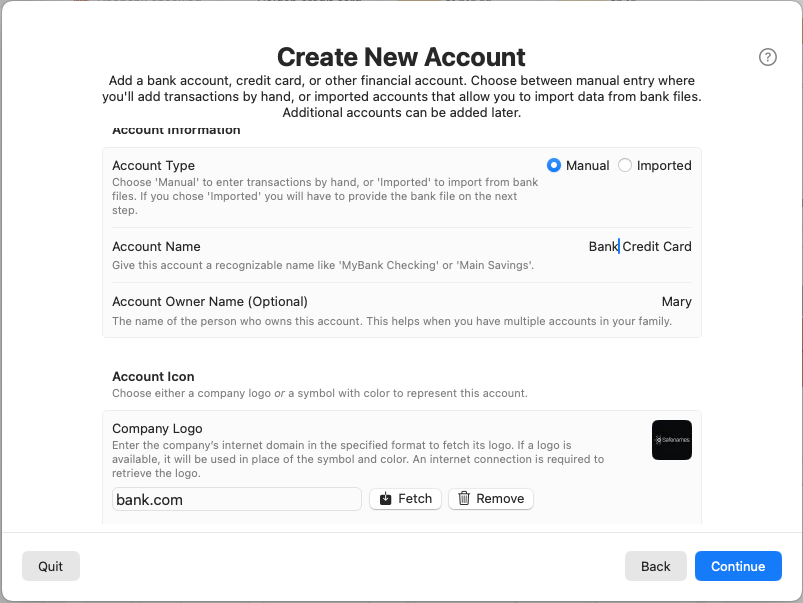
Account Information
Account Type
Choose how you'll manage transactions for this account:
- Manual - You'll enter transactions by hand
- Imported - You'll import transactions from bank files (requires file setup in next step)
Account Name
Give this account a recognizable name like "MyBank Checking" or "Main Savings Account."
Account Owner Name (Optional)
The name of the person who owns this account. This helps when you have multiple accounts in your family.
Account Icon
Choose either a company logo or a symbol with color to represent this account.
Company Logo
Enter the company's internet domain (like "chase.com" or "bankofamerica.com") to automatically fetch the bank's logo. If successful, this will be used instead of a symbol and color.
- Enter the domain in the format "example.com"
- Click Fetch to retrieve the logo
- Use Remove to delete a logo if needed
Symbol & Color
Click on the colored square to choose a symbol and color combination to represent this account. This provides a visual way to quickly identify the account throughout the app.
Step 5: Imported Account Setup
This step appears only if you selected "Imported" as your account type. Manual accounts skip directly to the summary.
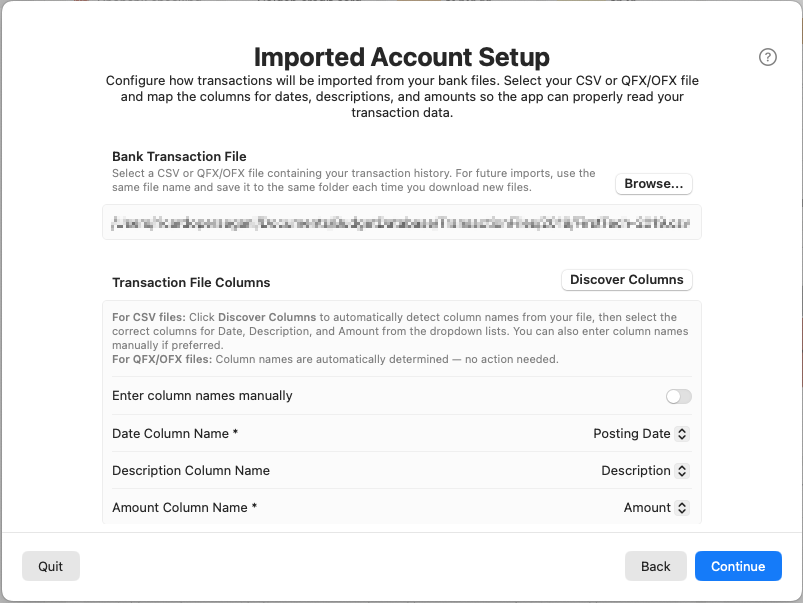
Bank Transaction File
File Selection
Select a CSV or QFX/OFX file containing your transaction history. For future imports, always use the same file name and save it to the same folder each time you download new files.
Click Browse... to select your transaction file from your computer.
Transaction File Columns
This section helps the app understand the structure of your bank's transaction file.
Discover Columns Button
Click this button to automatically analyze your selected file and populate the dropdown lists with available column names. After discovery, select the appropriate column for each field.
For CSV files: Use the Discover Columns button to automatically detect column names, then select the correct mappings.
For QFX/OFX files: Column names are automatically determined - no configuration needed.
Enter column names manually - Toggle this option if you prefer to type column names directly instead of selecting from dropdown lists.
Column Mapping
Date Column Name (Required)
Select or enter the column name that contains transaction dates (examples: "Date," "Transaction Date," "Posted Date").
Description Column Name
Select or enter the column name that contains transaction descriptions or merchant names (examples: "Description," "Memo," "Payee").
Amount Column Name (Required)
Select or enter the column name that contains transaction amounts (examples: "Amount," "Debit," "Credit").
Note: The Description column is optional due to issues in files generated by some banks, but it's highly recommended whenever available.
Step 6: Summary
Review all your selections before creating the budget.
The summary shows exactly what will be created:
Profile
- Displays profile information if a new profile will be created
- Shows the name and email address
Budget
- Shows the budget name, year, and setup method
- Indicates if standard categories will be created or copied from another budget
Account
- Displays account name, type (Manual/Imported), and icon
- For imported accounts, shows the transaction file path
- Indicates if existing transactions will be imported
Progress Tracking
When you click Create Budget, the assistant shows real-time progress as it:
- Creates your profile (if needed)
- Creates the budget structure
- Sets up categories and budget goals
- Creates the account
- Imports transactions (if applicable)
- Copies data from existing budgets (if selected)
- Performs cleanup tasks
If any errors occur during creation, the assistant will automatically roll back any partial changes and display an error message.
After Completion
Once the assistant completes successfully:
- Your new budget becomes the active budget
- The assistant window closes automatically
- You can begin using your budget immediately
Next Steps
- Review Transactions - Go to the Transactions tab to review imported transactions and assign categories
- Check Your Dashboard - Visit the Home tab to see your budget overview
- Explore Charts - Use the Charts section for visual analysis of your spending
- Manage Categories - Fine-tune your category setup in the Budget view
- Add More Accounts - Use Profile > Manage Accounts to add additional bank accounts, credit cards, or other financial accounts
Tips for Success
- File Organization - Keep transaction files in a consistent folder and use the same filename each time you download from your bank
- Regular Updates - Import new transaction files monthly or quarterly to keep your budget current
- Category Review - Periodically review and adjust your categories to match your spending patterns
- Backup Strategy - Consider creating regular backups of your budget data
The New Budget Assistant eliminates the complexity of manual setup and gets you started with a fully functional budget in just a few minutes.